What Do the Numbers on Sewing Machine Needles Mean? A Beginner's Guide
What Do Those Numbers on Your Sewing Machine Needle Mean?
It looks more complicated than it is, I promise. Once you understand the system, it makes choosing the right needle for each project so much easier. And as a bonus, it also explains why needles sometimes break, which I'll get to towards the end.
Let's go through it together.
🎥 Watch A Quick Video
The Two Numbers: Two Different Systems
Those two numbers are not the same measurement. They're actually two different sizing systems used in different parts of the world and both are printed on the packet for convenience.
The first number (80, 90, 100, etc.) is the European metric system. This is the one you'll see most commonly in the UK and across Europe.
The second number (12, 14, 16, etc.) is the American sizing system, used in the US market.
Both numbers refer to the same needle; they are just measured differently. You don't need to worry about converting between them. Simply look at the first number (the metric one) and use that as your guide.
What Does the Metric Number Relate To?
So an 80 needle has a shaft diameter of 0.8mm.
A 90 needle has a shaft diameter of 0.9mm.
A 75 needle has a shaft diameter of 0.75mm.
That's it. The number goes up, the needle gets thicker. The number goes down, the needle gets finer.
(If you want to find the number on the needle itself, it's etched into the shank - that's the flat, thick section at the very top of the needle. It's tiny and requires either excellent eyesight or a magnifying glass. Taking a photo on your phone and zooming in works brilliantly if your eyes are anything like mine.)
The Full Size Range Of Sewing Machine Needles
60/8 → very fine
70/10
75/11
80/12
90/14
100/16
110/18
120/20 → very thick
130/21 → thickest (the numbering oddly jumps here - don't ask me why!)
For most of your everyday sewing and quilting, you'll live in the middle of this range. The very fine end is for delicate fabrics, and the very thick end is for heavy-duty work.
Which Needle Size Do You Choose For Which Fabric?
Fine needles (60 - 70):
Light needles (70 - 75):
Medium needles (75 - 80 - 90):
Jersey, poly-cotton blends, and medium-weight fabrics also fall in this zone.
Heavier needles (100 - 110):
Very heavy needles (110 - 120+):
The Factor Most Beginners Miss: Layers
It's not just about the type of fabric. It's about how many layers you're sewing through.
Let me give you an example. You're making a bag from a lovely medium-weight quilting cotton. For most of the bag, you're sewing through two layers of fabric. Your 80/12 needle is perfect. Happy days.
But then you get to the handles.
A bag handle might be folded and stitched into four layers. And where that handle attaches to the bag, you might have six, eight, or even more layers stacked up on top of each other. Feel the difference between two layers of fabric in your hand and eight: it's considerable.
That 80/12 needle that was perfectly happy on two layers is now being asked to push through a very different amount of fabric. It will struggle. It may break. It will almost certainly cause frustration.
The same principle applies whenever you're doubling up fabric, for example with hemming, making binding strips, attaching straps, anywhere where layers multiply. You need to increase your needle size to match the actual thickness the needle is travelling through, not just the weight of the original fabric.
In a bag handle situation, I'd be looking at a 100 or 110. Try it and you'll feel the difference immediately.
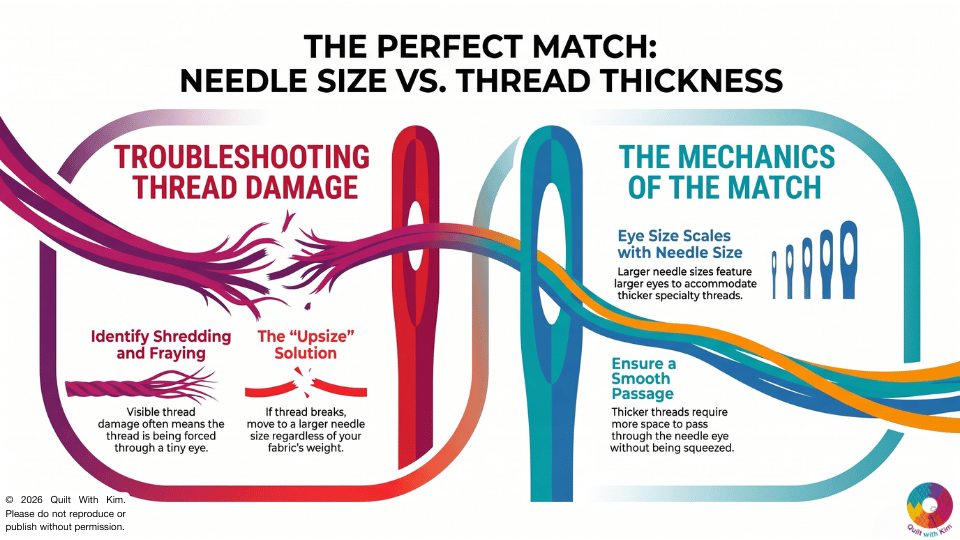
A Note on Why Needle Size Matters For Thread
If you're using a thicker thread, perhaps a heavier quilting thread or an embroidery thread you want to show up nicely on some appliqué, you may need to go up a needle size, even if your fabric would otherwise suggest staying where you are.
Why? Because larger needle sizes have slightly larger eyes. A thicker thread needs a bigger eye to pass through smoothly. If you keep using a finer needle with a thick thread, the thread gets squeezed through and starts to shred or potentially break.
So if you notice your thread fraying, shredding or breaking as you sew, the needle is the first thing to check.
Three Useful Ways To Diagnose Problems
Thread shredding or breaking:
Needle breaking:
Unexpectedly large holes appearing in your fabric:
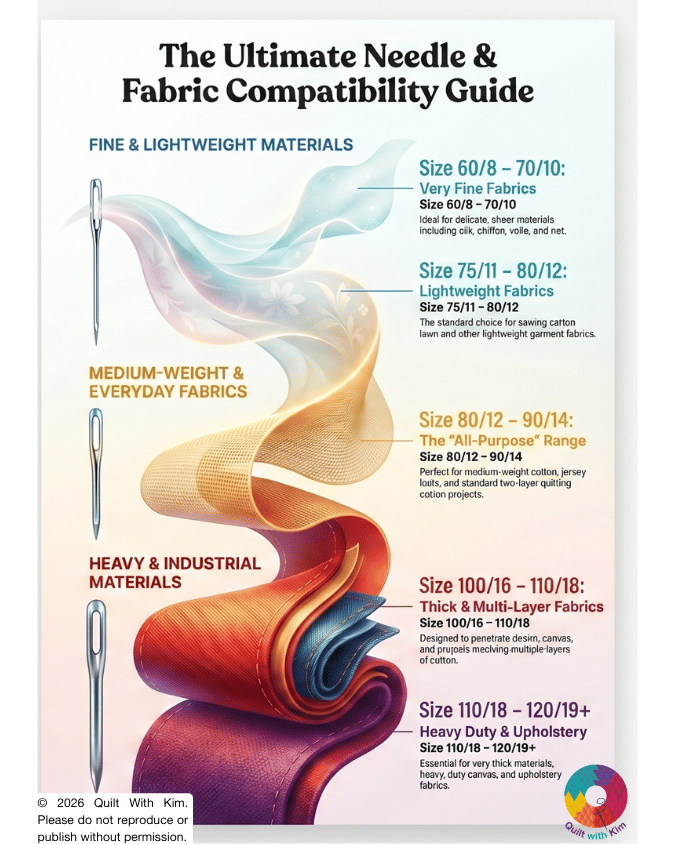
Quick Reference: Needle Size Guide
- 60/8 - 70/10 - Silk, chiffon, voile, net, very fine fabrics
- 75/11 - 80/12 - Cotton lawn, lightweight fabrics
- 80/12 - 90/14 - Quilting cotton (2 layers), medium-weight cotton, jersey
- 100/16 –110/18 - Multiple layers of cotton, denim, canvas, thick fabrics
- 110/18 – 120/19+ - Upholstery fabric, heavy canvas, very thick materials
What's Next in the Needle Series?
Kim xx


Kim also hosts a popular YouTube channel, Quilt With Kim, where she shares tutorials and tips tailored to beginners. She has also taught patchwork live on air on Sewing Street on TV.
Based in Gloucestershire, UK, Kim enjoys yoga, cooking, and seaside and country walks with her husband, Nige. Her chief quilting assistant, Shadow the cat, is always on hand to supervise her projects.
Download the FREE Beginner Quilter's Toolkit - a free guide to help you to know how to get started with quilting and to join Kim's newsletter list and begin your quilting journey today.
Download your FREE copy today.
PLUS comes with handy print out shopping guide!